How To Partition External Hard Disk: 8 Simple Steps

Partitioning storage devices is something you should always consider, whether it’s for your hard drive, flash drive, or any other device. In this article, we will be focusing on how to partition external hard disks in Windows.
Partitioning a disk can make it easier to organize files, such as video and photo libraries, especially if you have a large hard drive. Creating a separate partition for your system files can also help protect system data from corruption since each partition has its file system. Partitioning allows you to maximize your storage and keep your files safe.
In addition, partitioning allows you to use multiple file systems. While you may not have a use for various file systems on your internal drive, you can apply this to your external drives. For example, you can split your 1TB flash drive into sections – an exFAT, FAT32, or NTFS partition. This will allow it to work on Windows and macOS.
Let’s dive into the steps on how to partition an external hard disk in Windows 10.
Step 1: Connect your external hard disk to your computer.
Connect your external hard disk to your computer using a USB cable. Make sure that your computer recognizes the drive before proceeding to the next step.
Before you begin partitioning your external hard disk, it’s important to back up all your important data to avoid the risk of data loss. Once you have made a backup, you can proceed with the following steps to partition your external hard disk:
Step 2: Open Disk Management
Open the Disk Management utility by searching for “disk management” in the Start menu or by pressing the Windows key + X and selecting “Disk Management” from the menu.

Step 3: Select your external hard disk
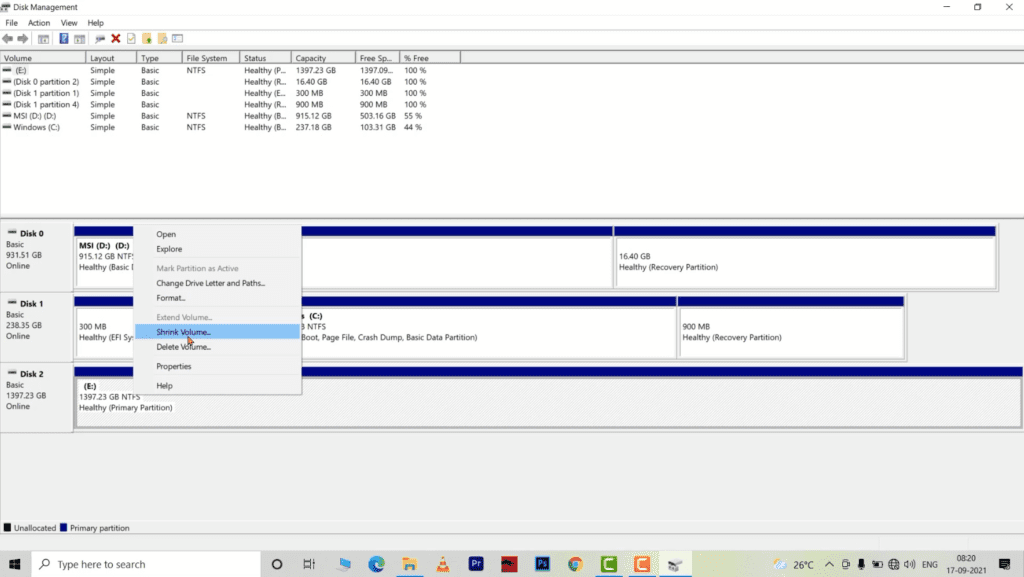
Once you have opened Disk Management, locate your external hard disk. You should be able to identify it by its size and the fact that it is marked as “Removable.” Right-click on the drive and select “Shrink Volume” from the context menu.
Step 4: Shrink the volume
In the Shrink window, you will see the total size of the disk, the size of the available space, and the amount of space that can be shrunk. Enter the amount of space that you want to allocate to the new partition in the “Enter the amount of space to shrink in MB” field. Keep in mind that 1 GB is equal to 1024 MB. Once you have entered the amount of space you want to shrink, click “Shrink.”
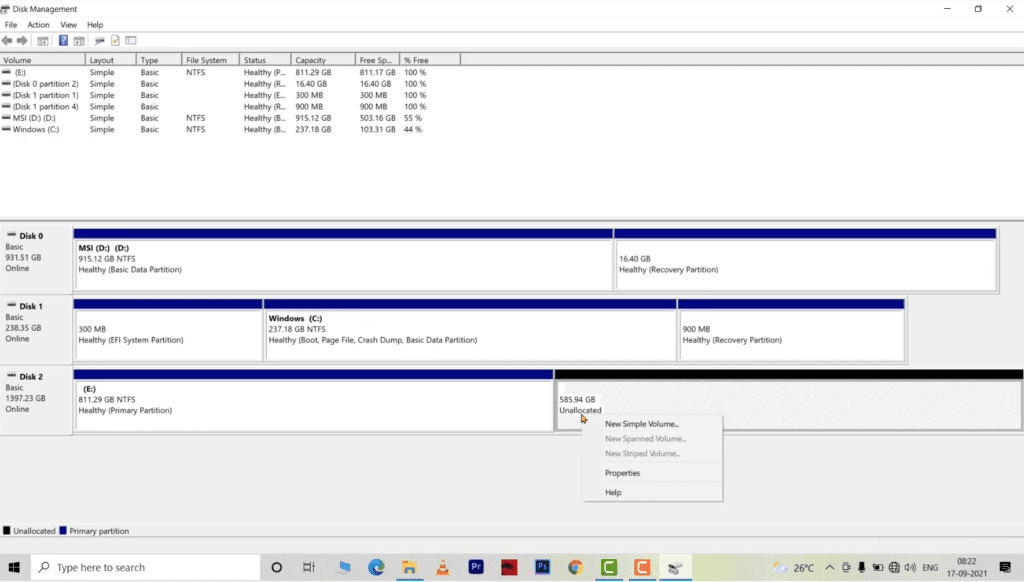
Step 5: Create a new partition
Once you have shrunk the volume, you will see an unallocated space on the disk. Right-click on the unallocated space and select “New Simple Volume” from the context menu.
In the New Simple Volume wizard, click “Next” to proceed. In the next window, enter the size of the partition that you want to create. You can also assign a drive letter to the new partition or use the default setting. Click “Next” to proceed.
In the next window, select the file system that you want to use for the new partition. You can choose between NTFS, FAT32, and exFAT. If you are unsure which one to choose, go with NTFS. Give your new partition a name and click “Next.”
In the final window, review your settings and click “Finish.” The wizard will create the new partition and format it with the file system you selected.
You can also watch this video if you want to follow these steps:
Step 6: Repeat the process
You can create additional partitions on your external hard disk by repeating the process above. Once you have created all the partitions you need, you can use them to store different types of files, such as photos, videos, documents, and more.
Step 7: Adjust partition sizes
If you want to adjust the size of your partitions later, you can do so using the same tools that you used to create them. For example, in Windows, you can use the Disk Management tool to shrink or extend a partition. In Linux, you can use the GParted tool to resize partitions.
To adjust partition sizes, follow these general steps:
- Open the disk management tool for your operating system.
- Locate the partition that you want to adjust and select it.
- Choose the option to shrink or extend the partition, depending on what you want to do.
- Follow the prompts to specify the new size of the partition.
- It’s important to note that when you adjust the size of a partition, you risk losing the data that is stored on it.
Step 8: Assign drive letters or mount points
Once you have created and adjusted your partitions as needed, you may need to assign drive letters or mount points to them. Drive letters are used in Windows to identify different storage devices or partitions, while mount points are used in Linux.
To assign a drive letter or mount point to a partition, follow these general steps:
- Open the disk management tool for your operating system.
- Locate the partition that you want to assign a drive letter or mount point and select it.
- Right-click the partition and choose the option to assign a drive letter or mount point.
- Follow the prompts to specify the new drive letter or mount point.
Frequently Asked Questions
Here are some common questions and answers about partitioning an external hard disk:
Q: What is partitioning and why is it useful?
A: Partitioning is the process of dividing a hard disk into multiple sections or partitions, each of which can be used to store data or run programs independently. Partitioning is useful for several reasons, such as organizing your files and programs, improving the performance of your computer, and reducing the risk of data loss.
Q: Can I partition my external hard disk without losing data?
A: Yes, you can partition your external hard disk without losing data, as long as you have enough free space on the disk and use a partitioning tool that supports non-destructive partitioning, such as Disk Management in Windows or Disk Utility in macOS. However, it’s always a good idea to make a backup of your important data before partitioning, just in case something goes wrong.
Q: How many partitions can I create on my external hard disk?
A: The number of partitions you can create on your external hard disk depends on several factors, such as the size of the disk, the available free space, the file system used, and the partitioning tool you are using. In general, most partitioning tools allow you to create up to four primary partitions or three primary partitions and one extended partition, which can contain multiple logical partitions.
Q: Can I merge or resize partitions on my external hard disk?
A: Yes, you can merge or resize partitions on your external hard disk using a partitioning tool that supports these features, such as Disk Management in Windows or third-party tools like EaseUS Partition Master, MiniTool Partition Wizard, or Paragon Partition Manager. However, these operations can be risky and time-consuming, so it’s important to back up your data and follow the instructions carefully.
Q: Can I partition my external hard disk on a Mac?
A: Yes, you can partition your external hard disk on a Mac using the built-in Disk Utility tool. Simply connect your external hard disk to your Mac, open Disk Utility, select the disk, and click the Partition tab. Follow the on-screen instructions to create a new partition, format it, and assign a name and mount point.
Q: Can I partition my external hard disk on a Linux system?
A: Yes, you can partition your external hard disk on a Linux system using the built-in GParted tool or other partitioning tools like fdisk, parted, or cfdisk. Simply connect your external hard disk to your Linux system, open the partitioning tool, select the disk, and create a new partition table if necessary. Then create a new partition, format it, and mount it to a directory of your choice.
Conclusion
Partitioning an external hard disk is a simple and effective way to organize your data and improve the performance of your computer. By following the steps and tips outlined in this article, you can partition your external hard disk with confidence and enjoy the benefits of a more efficient and reliable storage solution. Remember to back up your data before partitioning, choose a reliable partitioning tool, and plan your partitions carefully based on your needs and preferences.
We hope you found this article helpful and informative. If you have any questions or feedback, please feel free to leave a comment below. And don’t forget to share this article with your friends and colleagues who might find it useful.
You can also read about 7 powerful ways for maximizing disk space with effective cleanup techniques
Also, read about AI-Powered design software

This is a very useful information indeed.